ClusterSuite4 consists of the Cluster Configuration System (CCS), lock manager and other support utilities required by a GULM implementation. This cluster has four RAC nodes and three GULM lock server nodes. Unless stated otherwise in the Notes section, the following software must be loaded on all seven nodes. This is the list for a 64-bit install:
| RPM | Notes |
|---|---|
|
ccs-1.0.3-0.x86_64.rpm |
Cluster configuration system |
|
gulm-1.0.6-0.x86_64.rpm |
Grand unified lock manager |
|
fence-1.32.18-0.x86_64.rpm |
The fence-1.32.18-0.x86_64.rpm rpm installs the fenced daemon, which is only used by the DLM, not GULM. Currently only GULM implementations are certified for use with 10gRAC. It should be disabled: lock1 $ chkconfig –level 35 fenced off |
|
perl-Net-Telnet-3.03-3.noarch.rpm |
The perl-Net-Telnet-3.03-3.noarch.rpm rpm is required by the fence_ilo process that would be called by GULM in the event that any of the nodes needed fencing. |
|
magma-1.0.4-0.x86_64.rpm |
n/a |
|
magma-plugins-1.0.6-0.x86_64.rpm |
n/a |
|
rgmanager-1.9.46-0.x86_64.rpm |
The rgmanager-1.9.46-0.x86_64.rpm installs the cluster status utility clustat and should be installed on all seven nodes. |
|
system-config-cluster-1.0.25-1.0.noarch.rpm |
The system-config-cluster-1.0.25-1.0.noarch.rpm only needs to be installed on the nodes where you choose to run the cluster configuration GUI. It was installed on lock1, which is the primary lock server, but it can be installed on all of them. It is not necessary to install this package on the DB nodes. |
Table 3.1. List for 64-bit Install
External GULM servers need to be created in sets of 1,3,5 so that accurate quorum voting can occur. In this cluster, there will be three external lock servers. For initial testing, only the first lock server (hostname lock1) will be configured and started.
You can run system-config-cluster over X11 or from the system console on lock1. Normally, it is best to initially configure from run-level 2 (init [2]), so that services will not automatically startup at reboot before configuration testing is complete. Once a functioning cluster is verified, the system can be switched to either run-level 3 or 5. This configuration example will run the GUI tool remotely using X11.
In this example, the remote hostname where the X windows will appear is called adminws. For X11, xhost + must be executed on adminws from any session running on this system. A shell window on adminws will login to lock1 via ssh and must have the DISPLAY environment variable set prior to running any X11 application.
lock1 $ export DISPLAY=adminws:0.0
Run xclock, to make sure that the X11 clock program appears on the adminws desktop.
Tip
Running X through a firewall often requires you to set the flag on the ssh command and possibly fiddle with the .ssh/config file so that ForwardX11 yes is included. Remember to disable this feature once you are preparing to run the 10gCRS installer as it will need to execute ssh commands between nodes (such as ssh hostname date) that only return the date string (in this case) and nothing else.
| Network Interface | Hostname |
|---|---|
|
192.168.1.154 |
lock1 |
|
192.168.2.154 |
lock1-gulm |
|
192.168.2.54 |
lock1-ilo |
Table 3.2. Network Interface and Hostnames
When using HP iLO power management, there is a fence device for every node in the cluster. This is different from having one single device that fences all nodes (for example, a Brocade switch). When the node named lock1-gulm is created, the corresponding fence device will be lock1-ILO. It is mandatory that the iLO network be accessible from the lock1 server. They share the same interface in this example, but this is not mandatory. Typically, there is only one iLO interface port, so using the same network interface and switch as the CS4 heartbeat does not incur any further failure risk. Full hardening of iLO is limited by the interface processor’s single port, but the fencing fabric could use bonded NICs on all servers and a hardened production VLAN.
Although lock server hostnames and RAC node hostnames have a different naming convention, these services share the same physical interface in this cluster. The hostname conventions are different to emphasize that it is possible to further separate RAC and GULM networks if required for performance (not reliability). RAC-vip hostnames could also be defined on a separate physical network so that redundant pathways to the application tiers can be also configured. Hardening is an availability business requirement and this sample cluster emphasizes a cost-effective balance between availability and complexity.
-
Run:
lock1 $ sudo /usr/bin/system-config-cluster
-
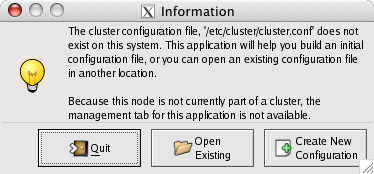
Click Create New Configuration.
-
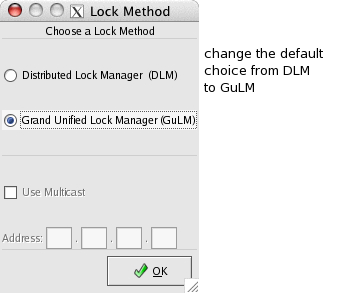
Click the Grand Unified Lock Manager (GuLM) radio button, and then click OK.
-
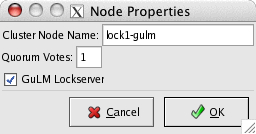
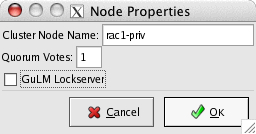
Highlight Cluster Nodes in the Cluster pane, which will present the Add a Cluster Node button in the Properties pane. Clicking Add a Cluster Node presents the Node Properties window:
-
Set Quorum Votes to 1, select GuLM Lockserver and click OK.
-
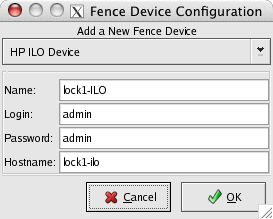
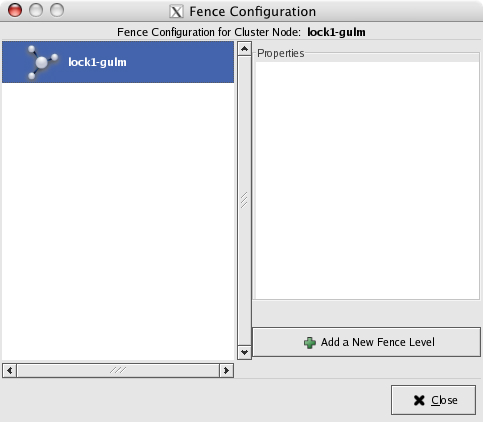
Select Fence Devices in the Cluster pane and then click Add a Fence Device:
-
The username and password default for iLO systems is set at the factory to admin/admin. The hostname for the iLO interface is lock1-ilo. The name of the fence device is lock1-ILO. Click OK.
-
The fence device needs to be linked to the node in order to activate fencing.
-
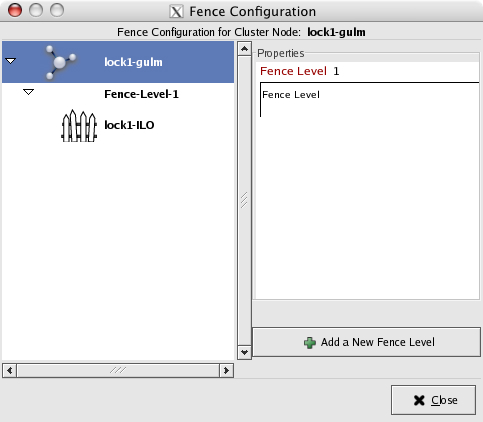
Click Add a New Fence Level:
-
Click Add a New Fence to this Level.
-
After you click OK and close this window, the main window now shows that lock1-gulm is associated with the fence level. The Properties pane should convey this by the message, "one fence in one fence level."
-
Click Close.
-
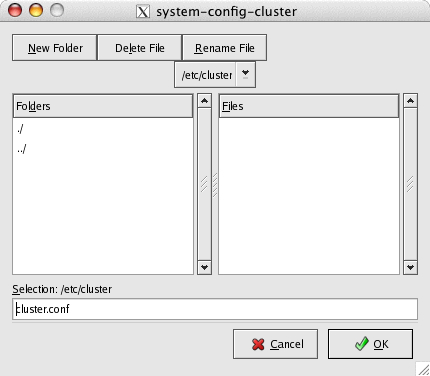
Now save this configuration and then test that this single GULM lock server can start up. Save the file into /etc/cluster/cluster.conf using the File->Save menu option in the Cluster Configuration tool.

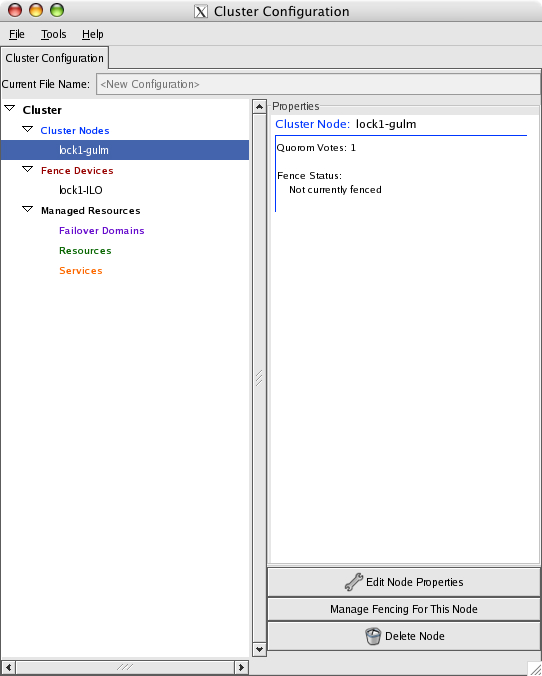


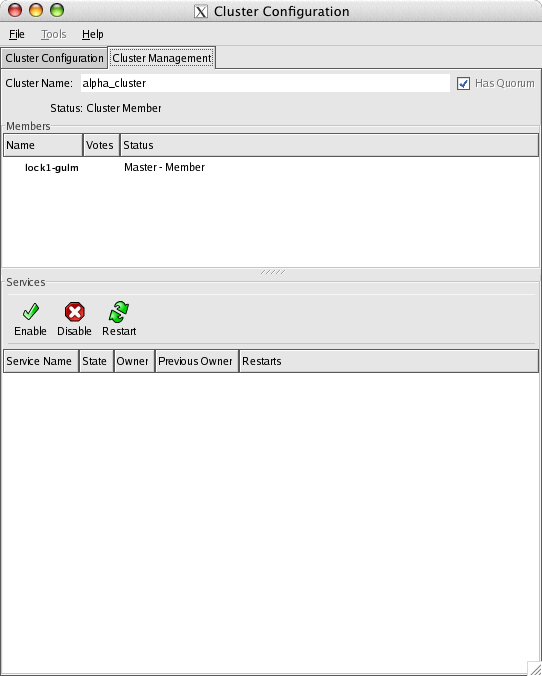
The /etc/cluster/cluster.conf file now contains one master GULM lock server and it is now possible to exit the GUI. Once the first lock server is running, re-starting the GUI tool will now permit the Cluster Management tab to be selected and the server should appear in this display.
There is an additional configuration file for GULM that needs to be changed to be consistent with the /etc/cluster/cluster.conf file that was just created. This is the /etc/sysconfig/cluster file.
#
# Node-private
#
GULM_OPTS="--name lock1-gulm --cluster alpha_cluster --use_ccs"
Make sure that the –-name parameter is the same name as the cluster node that was chosen in the GUI tool. The default for this file is to use the server hostname, but this causes GULM to run over the public network interface. GULM traffic in this cluster will run over a private network that corresponds to the hostname lock1-gulm. If the cluster name was changed in the /Cluster Properties pane in the GUI, then the --cluster parameter must be changed to match that value. If these values do not exactly match, then GULM will not startup successfully.
Because there is only one defined lock server in the configuration, quorum will be attained as soon as this lock server starts successfully. When changing the configuration to support three external GULM lock servers, then a minimum of two are needed to successfully start before the cluster is quorate and operations on the cluster can proceed. The advantage of configuring the GULM servers first is that it insures there will be a quorate cluster when the other Oracle RAC nodes are being defined and transitioned into the cluster.
Note
Quorate (or Inquorate) is the term used in the system log to indicate the presence (or absence) of a GULM lock server quorum. Without quorum, no access to the storage is permitted.
Tip
Set /etc/inittab to 2, so that when you transition to init3 or init5, you can do it from a system that is running and accessible (tail -f /var/log/messages for debug).
-
Open two terminal windows on lock1: one for typing commands and one for running tail –f /var/log/messages.
Note
Making the /var/log/messages file visible to the user oracle or orainstall will make the procedure easier. As these users need to read /var/log/messages much more frequently in a RAC environment, providing group read permission is recommended, at least during the install.
-
Because lock1 is running in run-level 2, ccsd, lock_gulmd would not be running accidentally (for instance, you had to reboot the server after installing the RPMs). Start up the ccsd process:
$ lock1 sudo service ccsd start
lock1 ccsd[7960]: Starting ccsd 1.0.3:
lock1 ccsd[7960]:  Built: Jan 25 2006 16:54:43
lock1 ccsd[7960]:  Copyright (C) Red Hat, Inc.  2004 All rights reserved.
lock1 ccsd: startup succeeded
-
Start up the GULM lock process:
$ sudo service lock_gulmd start
lock1 lock_gulmd_main[5507]: Forked lock_gulmd_core.
lock1 lock_gulmd_core[5509]: Starting lock_gulmd_core 1.0.6. (built Feb 13 2006 15:08:25) Copyright (C) 2004 Red Hat, Inc.  All rights reserved.
lock1 lock_gulmd_core[5509]: I am running in Standard mode.
lock1 lock_gulmd_core[5509]: I am (lock1-gulm) with ip (::ffff:192.168.2.154)
lock1 lock_gulmd_core[5509]: This is cluster alpha_cluster
lock1 lock_gulmd_core[5509]: I see no Masters, So I am becoming the Master.
lock1 lock_gulmd_core[5509]: Could not send quorum update to slave lock1-gulm
lock1 lock_gulmd_core[5509]: New generation of server state. (1145002309185059)
lock1 lock_gulmd_core[5509]: EOF on xdr (Magma::5479 ::1 idx:1 fd:6)
lock1 lock_gulmd_main[5507]: Forked lock_gulmd_LT.
lock1 lock_gulmd_LT[5513]: Starting lock_gulmd_LT 1.0.6. (built Feb 13 2006 15:08:25) Copyright (C) 2004 Red Hat, Inc.  All rights reserved.
lock1 lock_gulmd_LT[5513]: I am running in Standard mode.
lock1 lock_gulmd_LT[5513]: I am (lock1-gulm) with ip (::ffff:192.168.2.154)
lock1 lock_gulmd_LT[5513]: This is cluster alpha_cluster
lock1 lock_gulmd_core[5509]: EOF on xdr (Magma::5479 ::1 idx:2 fd:7)
lock1 lock_gulmd_main[5507]: Forked lock_gulmd_LTPX.
lock1 lock_gulmd_LTPX[5519]: Starting lock_gulmd_LTPX 1.0.6. (built Feb 13 2006 15:08:25) Copyright (C) 2004 Red Hat, Inc.  All rights reserved.
lock1 lock_gulmd_LTPX[5519]: I am running in Standard mode.
lock1 lock_gulmd_LTPX[5519]: I am (lock1-gulm) with ip (::ffff:192.168.2.154)
lock1 lock_gulmd_LTPX[5519]: This is cluster alpha_cluster
lock1 lock_gulmd_LTPX[5519]: New Master at lock1-gulm ::ffff:192.168.2.154
lock1 lock_gulmd_LT000[5513]: New Client: idx 2 fd 7 from lock1-gulm ::ffff:192.168.2.154
lock1 lock_gulmd_LTPX[5519]: Logged into LT000 at lock1-gulm ::ffff:192.168.2.154
lock1 lock_gulmd_LTPX[5519]: Finished resending to LT000
lock1 ccsd[5478]: Connected to cluster infrastructure via: GuLM Plugin v1.0.3
lock1 ccsd[5478]: Initial status:: Quorate
lock1 lock_gulmd: startup succeeded
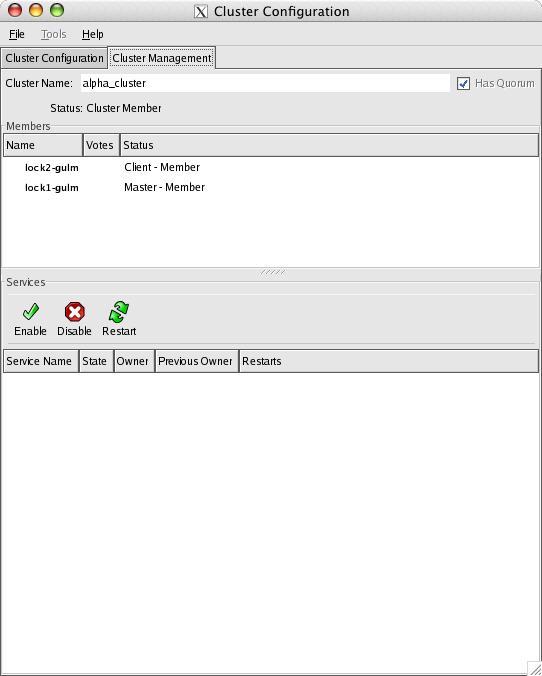
Because rgmanager was installed on this node, the clustat utility can be used to verify the status of this lock manager:
$ sudo clustat
Member Name                              Status
------ ----                              ------
lock1-gulm                               Online, Local, rgmanager
Restart the GUI:
lock1 $ sudo system-config-cluster
Click on the window tab Cluster Management:
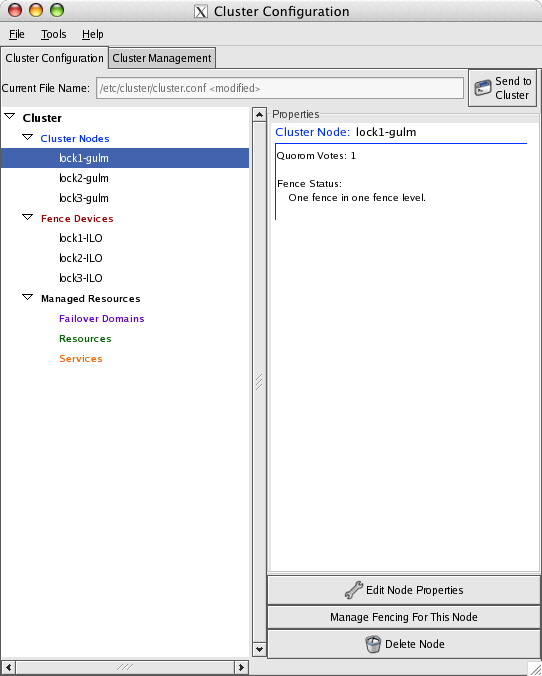
This involves repeating the steps for the first servers and following the naming conventions setup for the hostnames. When these steps are complete, the current configuration should show three nodes and three fence devices.
Save the new configuration!
It is critical that you save this new configuration in the GUI tool before returning to the shell session that you used to start up the 1st lock server. The GUI tool can remain running.
The /etc/cluster/cluster.conf and /etc/sysconfig/cluster files need to be manually copied to the other lock servers during this bootstrap process. It will be easier to debug this step if both lock2 and lock3 are also at init [2] and all the CS4 components need to be installed. If rpm installation was not performed on these nodes (as per Section 4.1, “Installing CLVM components”), then do this now.
Manually copy the current /etc/cluster/cluster.conf
# scp /etc/cluster/cluster.conf lock2:/etc/cluster
# scp /etc/cluster/cluster.conf lock3:/etc/cluster
Localized /etc/sysconfig/cluster file on each respective node:
#
# Node-private
#
GULM_OPTS="--name lock2-gulm --cluster alpha_cluster --use_ccs"
# Node-private
#
GULM_OPTS="--name lock3-gulm --cluster alpha_cluster --use_ccs"
Repeating the steps on lock2 and lock3, both ccsd and lock_gulmd need to be started and checked. Each node should have a window with tail –f /var/log/messages. This example is only showing the lock_gulmd progress. If ccsd would not start up, it is usually because of parsing errors in the /etc/cluster/cluster.conf file. The file was created correctly, but if could fail if the /etc/hosts file did not contain all the referenced hostnames. Copying the files from a working lock server (including the /etc/hosts file) reduces the risk of parsing errors.
$ sudo service ccsd start
$ sudo service lock_gulmd start
lock2 lock_gulmd_LTPX[3380]: I am running in Standard mode.
lock2 lock_gulmd_LTPX[3380]: I am (lock2-gulm) with ip (::ffff:192.168.2.155)
lock2 lock_gulmd_LTPX[3380]: This is cluster alpha_cluster
lock2 lock_gulmd_LTPX[3380]: New Master at lock1-gulm ::ffff:192.168.2.154
lock2 lock_gulmd_LTPX[3380]: Logged into LT000 at lock1-gulm ::ffff:192.168.2.154
lock2 lock_gulmd_LTPX[3380]: Finished resending to LT000
lock2 ccsd[3340]: Connected to cluster infrastructure via: GuLM Plugin v1.0.3
Verify the status check the status of the cluster using clustat:
lock1 $ clustat
Member Status: Quorate
Member Name                              Status
------ ----                              ------
lock1-gulm                               Online, Local, rgmanager
lock2-gulm                               Online, rgmanager
The GUI Cluster Management tab should be the same:
Note
The Send to Cluster button in the upper right hand corner of the Cluster Configuration tab will send the current configuration only to nodes that have cluster status shown above. Because each node is brought up one at a time during initial test and setup, this feature is not initially useful. Once the cluster is completely up and running and all the nodes are in the cluster, this option is an effective way to distribute changes to /etc/cluster/cluster.conf.
The steps to adding the four RAC nodes are identical to the adding lock servers. The only difference is the hostname convention. GULM and RAC heartbeat share the same physical interface, but the hostname convention indicates that these networks could be physically separated. The –priv suffix is a RAC hostname convention. During the Add a Cluster Node step, use this hostname convention and do not check the GuLM Lockserver box
Fence devices follow the same naming convention and the only difference is that the rac1-ILO fence device is associated with rac1-priv.
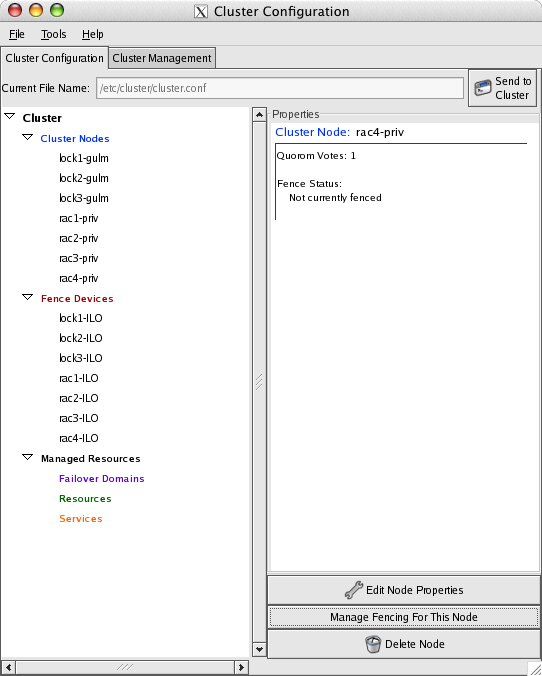
The completed configuration should show all seven cluster nodes and fence devices.
Managed Resources
This section does not need to be configured, as it is the responsibility of the Oracle Clusterware to manage the RAC database resources. This section is reserved for CS4 hot-standby non-RAC configurations.
The /etc/cluster/cluster.conf and /etc/sysconfig/cluster files need to be manually copied to the other db nodes during this bootstrap process. It will be easier to debug this step if all db nodes are also at init [2] and all the CS4 components need to be installed. If the rpm installation was not performed on these nodes (as per Section 4.1, “Installing CLVM components”), then do this now.
-
Manually copy the current /etc/cluster/cluster.conf:
# scp /etc/cluster/cluster.conf rac1:/etc/cluster
# scp /etc/cluster/cluster.conf rac2:/etc/cluster
# scp /etc/cluster/cluster.conf rac3:/etc/cluster
# scp /etc/cluster/cluster.conf rac4:/etc/cluster
-
Localized /etc/sysconfig/cluster file on each respective node:
#
# Node-private
#
GULM_OPTS="--name rac1-priv --cluster alpha_cluster --use_ccs"
#
# Node-private
#
GULM_OPTS="--name rac2-priv --cluster alpha_cluster --use_ccs"
#
# Node-private
#
GULM_OPTS="--name rac3-priv --cluster alpha_cluster --use_ccs"
#
# Node-private
#
GULM_OPTS="--name rac4-priv --cluster alpha_cluster --use_ccs"
ccsd and lock_gulmd need to be started and verified on every node. Each node should have a window with tail –f /var/log/messages:
$ sudo service ccsd start
rac1 ccsd[2520]: Starting ccsd 1.0.3:
rac1 ccsd[2520]:  Built: Jan 25 2006 16:54:43
rac1 ccsd[2520]:  Copyright (C) Red Hat, Inc.  2004  All rights reserved.
rac1 ccsd: startup succeeded
rac1 ccsd[2520]: cluster.conf (cluster name = alpha_cluster, version = 10) found.
rac1 ccsd[2520]: Unable to perform sendto: Cannot assign requested address
rac1 ccsd[2520]: Remote copy of cluster.conf is from quorate node.
rac1 ccsd[2520]:  Local version # : 10
rac1 ccsd[2520]:  Remote version #: 10
rac1 ccsd[2520]: Connected to cluster infrastructure via: GuLM Plugin v1.0.3
rac1 ccsd[2520]: Initial status:: Quorate
rac1 ccsd[2520]: Cluster is quorate.  Allowing connections.
$ sudo service lock_gulmd start
rac1 lock_gulmd_main[2573]: Forked lock_gulmd_LT.
rac1 lock_gulmd_LT[2583]: Starting lock_gulmd_LT 1.0.6. (built Feb 13 2006 15:08:25) Copyright (C) 2004 Red Hat, Inc.  All rights reserved.
rac1 lock_gulmd_LT[2583]: I am running in Fail-over mode.
rac1 lock_gulmd_LT[2583]: I am (rac1-priv) with ip (::ffff:192.168.2.150)
rac1 lock_gulmd_LT[2583]: This is cluster alpha_cluster
rac1 lock_gulmd_LT000[2583]: Not serving locks from this node.
rac1 lock_gulmd_core[2579]: EOF on xdr (Magma::2521 ::1 idx:2 fd:7)
rac1 lock_gulmd_main[2573]: Forked lock_gulmd_LTPX.
rac1 lock_gulmd_LTPX[2588]: Starting lock_gulmd_LTPX 1.0.6. (built Feb 13 2006 15:08:25) Copyright (C) 2004 Red Hat, Inc.  All rights reserved.
rac1 lock_gulmd_LTPX[2588]: I am running in Fail-over mode.
rac1 lock_gulmd_LTPX[2588]: I am (rac1-priv) with ip (::ffff:192.168.2.150)
rac1 lock_gulmd_LTPX[2588]: This is cluster alpha_cluster
rac1 lock_gulmd_LTPX[2588]: New Master at lock1-gulm ::ffff:192.168.2.154
rac1 lock_gulmd_LTPX[2588]: Logged into LT000 at lock1-gulm ::ffff:192.168.2.154
rac1 lock_gulmd_LTPX[2588]: Finished resending to LT000
rac1 lock_gulmd: startup succeeded
Verify that all nodes are in the cluster:
rac1 $ clustat
Member Status: Quorate
  Member Name                              Status
  ------ ----                              ------
  rac1-priv                                Online, Local, rgmanager
  rac3-priv                                Online, rgmanager
  lock2-gulm                               Online, rgmanager
  rac4-priv                                Online, rgmanager
  rac2-priv                                Online, rgmanager
  lock1-gulm                               Online, rgmanager
The system should now be capable of supporting LVM2 volumes and the next step is to install and configure the Cluster LVM2 software as well as allocating the logical volumes for use by GFS. Once the GFS volumes are created and mounted, the Oracle installation can commence.
A clean shutdown may be required for maintenance or other reasons. A GULM cluster will not cleanly shutdown once it is has lost quorum. The process of stopping the last two lock servers needs to be coordinated so a clean shutdown of both of these remaining lock servers is possible.
Shutting down the last two nodes that hold quorum will cause the cluster to become inquorate and all activity on the cluster is blocked, including the ability to proceed with a normal shutdown. These steps will insure a clean shutdown and only apply to the last two lock servers that are holding quorum. All other nodes should shut down normally.
Although clvmd has not been configured yet in this guide, it is a lock server client, so this protocol assumes it is running.
-
Remove existing lock server clients from each of the remaining nodes holding quorum:
lock2 $ sudo service rgmanager stop
lock2 $ sudo service clvmd stop
lock1 $ sudo service rgmanager stop
lock1 $ sudo service clvmd stop
-
Stop the GULM lock manager on lock2. This will cause the cluster to be in-quorate at this time.
lock2 $ sudo service lock_gulmd stop
-
The remaining GULM lock manager must be shutdown using the gulm_tool utility and output from /var/log/messages shows that the core is shutdown cleanly.
lock1 $ sudo gulm_tool shutdown lock1
lock1 lock_gulmd_core[3100]: Arbitrating Node Is Logging Out NOW!
lock1 lock_gulmd_LTPX[3110]: finished.
lock1 lock_gulmd_core[3100]: finished.
lock1 lock_gulmd_LT000[3105]: Core is shutting down.
lock1 lock_gulmd_LT000[3105]: finished.
Once this is complete, both servers can be shutdown cleanly as ccsd will be able to terminate normally.